
I recently bought a Volkswagen ID.3 and in this guide we will see how to import the data displayed by the Volkswagen WeConnect ID app into the Home Assistant and how to create sensors to record various data such as the battery charge status, the autonomy, the charging power in Watts (which at the moment it is not possible to obtain from the car infotainment) and much more.
Before we start
In this guide I will assume that you have already installed Home Assistant (you can find a lot of guides online, the official one can be found here [for example I have installed the Home Assistant operating system in a virtual machine, but it is also possible install it on a raspberry pi]).
Then you need to install the “ha_vwid” component available on the “Home Assistant Community Store” (even if it is called store, everything is free, don’t worry).
To get it you will need to install the Home Assistant Community Store through this guide and then you will need to install the “ha_vwid” component following the guide in the Github repository (or directly in HACS after adding the repository in custom repositories).
Configuring the Volkswagen ID component in Home Assistant
The first thing to do to import WeConnect ID data into Home Assistant is to activate the component installed previously by entering your credentials during the configuration procedure. To do this, you must first enter the “Settings>Integrations” section and then click on “Add Integration“. Search and click on “Volkswagen ID“. You should see a window like this:
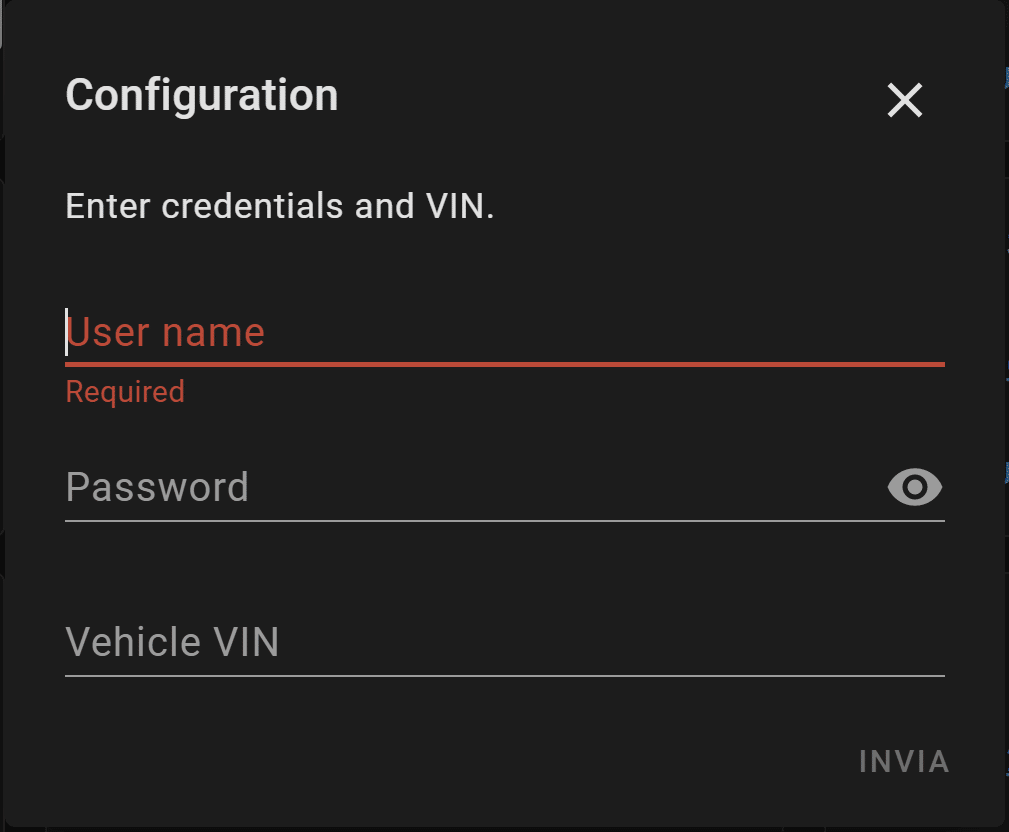
Then enter your WeConnect ID credentials (username and password) and then enter the VIN code of the vehicle.
ATTENTION:
Before activating the integration in Home Assistant you have to connect the official Volkswagen WeConnect ID app to your vehicle).
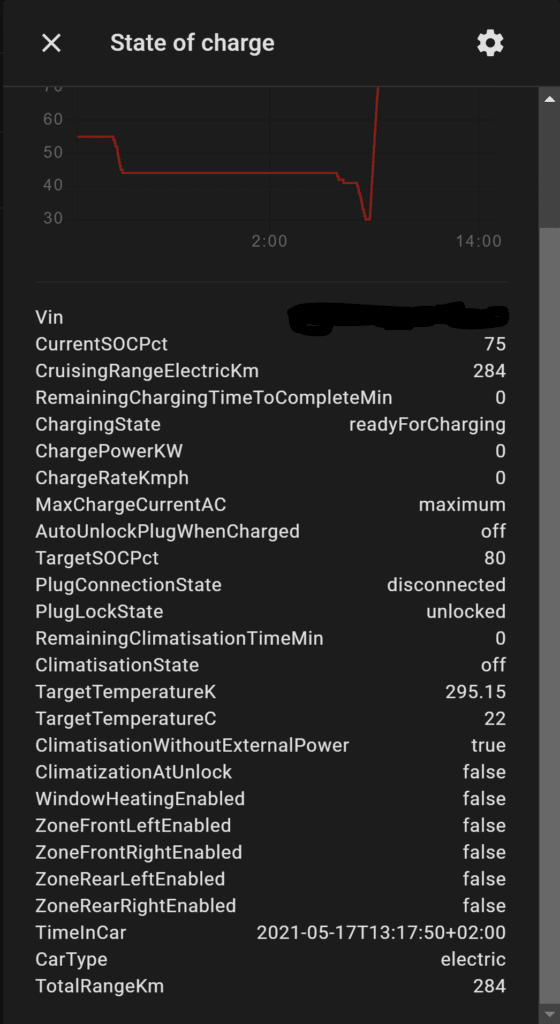
After restarting the Home Assistant server (go to “Settings>Server Controls>Server Management” and click “Restart“) a new entity will be available in “Settings>Entity” and it will be called “State of Charge” which will indicate the SOC of the car and it will show all other relevant data as attributes.
Create custom sensors to collect all WeConnect ID data in Home Assistant
To collect the data shown as attributes from the sensor automatically generated by the integration, it will be necessary to create a custom sensor in Home Assistant for each attribute. To do this we need to add the following code in the sensor section of the “configuration.yaml” file of Home Assistant (if you don’t know what I’m talking about you can read this guide) (instead of “[vin]” you will have to write the VIN code of your vehicle):
  #ID3 Charge state
  - platform: template
    sensors:
      id3_charge_state:
        friendly_name: "State of Charge"
        unit_of_measurement: "%"
        value_template: '{{ states.sensor.[vin]_soc.attributes.CurrentSOCPct }}'

  #ID3 Charge Power
  - platform: template
    sensors:
      id3_charge_power:
        friendly_name: "Charging Power"
        unit_of_measurement: "kW"
        value_template: '{{ states.sensor.[vin]_soc.attributes.ChargePowerKW }}'

  #ID3 Climatization State
  - platform: template
    sensors:
      id3_climatization_state:
        friendly_name: "Climatization State"
        value_template: '{{ states.sensor.[vin]_soc.attributes.ClimatisationState }}'

  #ID3 Range
  - platform: template
    sensors:
      id3_range:
        friendly_name: "Range"
        unit_of_measurement: "Km"
        value_template: '{{ states.sensor.[vin]_soc.attributes.CruisingRangeElectricKm }}'
After restarting the server again the sensors will be available in Home Assistant (you’ll see them inside “Settings>Entities“).
Customization of icons based on status
To make the graphical interface more attractive we need to make sure that the icons change according to the data imported from WeConnect ID in Home Assistant.
To change the icons and the color of the icons based on the WeConnect ID data in Home Assistant I used the custom-ui component available on the “Home Assistant Community Store”. To get it you will need to install the component following the guide in the Github repository (in my case it was also necessary to install this other componentto make everything work correctly).
We will then have to insert inside “configuration.yaml” under the “homeassistant” section the name of the file, that will be inserted in the same folder as the configuration file, in which we’ll write the customizations (I use an external file to keep everything in order, but you could also write the customizations directly inside the configuration file). The result is the following (in my case I called the file “customizations.yaml“):
homeassistant:

  customize: !include customizations.yaml
Then you’ll need to insert the following code in the “customize” section of the Home Assistant configuration file (or in the dedicated file):
sensor.id3_charge_state:
  templates:
    icon: >
      if (state < 10) return 'mdi:battery-alert-variant-outline';
      if (state < 15) return 'mdi:battery-10';
      if (state < 25) return 'mdi:battery-20';
      if (state < 35) return 'mdi:battery-30';
      if (state < 45) return 'mdi:battery-40';
      if (state < 55) return 'mdi:battery-50';
      if (state < 65) return 'mdi:battery-60';
      if (state < 75) return 'mdi:battery-70';
      if (state < 85) return 'mdi:battery-80';
      if (state < 95) return 'mdi:battery-90';
      if (state >= 95) return 'mdi:battery';
      else return 'mdi:alert-octagon';
    icon_color: >
      if (state < 10) return 'rgb(229,0,0)';
      if (state < 15) return 'rgb(253,101,40)';
      if (state < 25) return 'rgb(251,141,35)';
      if (state < 35) return 'rgb(249,183,30)';
      if (state < 45) return 'rgb(248,226,24)';
      if (state < 55) return 'rgb(222,246,19)';
      if (state < 65) return 'rgb(172,245,14)';
      if (state < 75) return 'rgb(122,243,9)';
      if (state < 85) return 'rgb(70,241,4)';
      if (state < 95) return 'rgb(17,239,0)';
      if (state >= 95) return 'rgb(0,255,0)';
      else return 'rgb(255,0,0)';

sensor.id3_charge_power:
  templates:
    icon: >
      if (state > 11) return 'mdi:ev-plug-ccs2';
      if (state > 0) return 'mdi:ev-plug-type2';
      else return 'mdi:power-plug-off';
    icon_color: >
      if (state > 0) return 'rgb(0,255,0)';

sensor.id3_climatization_state:
  templates:
    icon: >
      if (state === "ventilation") return 'mdi:fan';
      if (state === "cooling") return 'mdi:car-seat-cooler';
      if (state === "heating") return 'mdi:car-seat-heater';
      else return 'mdi:fan-off';
    icon_color: >
      if (state === "cooling") return 'rgb(62,219,240)';
      if (state === "heating") return 'rgb(207,0,0)';
Finally restart Home Assistant to apply the changes.
Creation of a custom dashboard
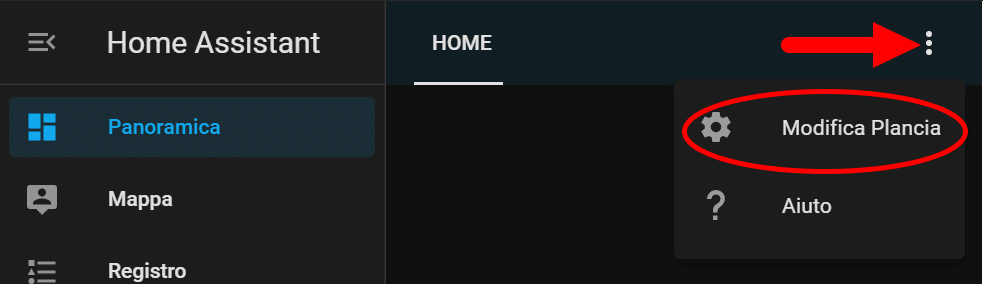
Since I’m also going to connect a wallbox to Home Assistant (I’ll write a guide about it) I decided to create a dashboard dedicated to car management (if you want you can skip this section and go to the next). To do this, simply select “edit dashboard” from the Overview section of Home Assistant to enter the editor.
Then just press the “add” button (the one with the “+” icon) and enter the necessary information as shown in the image below:
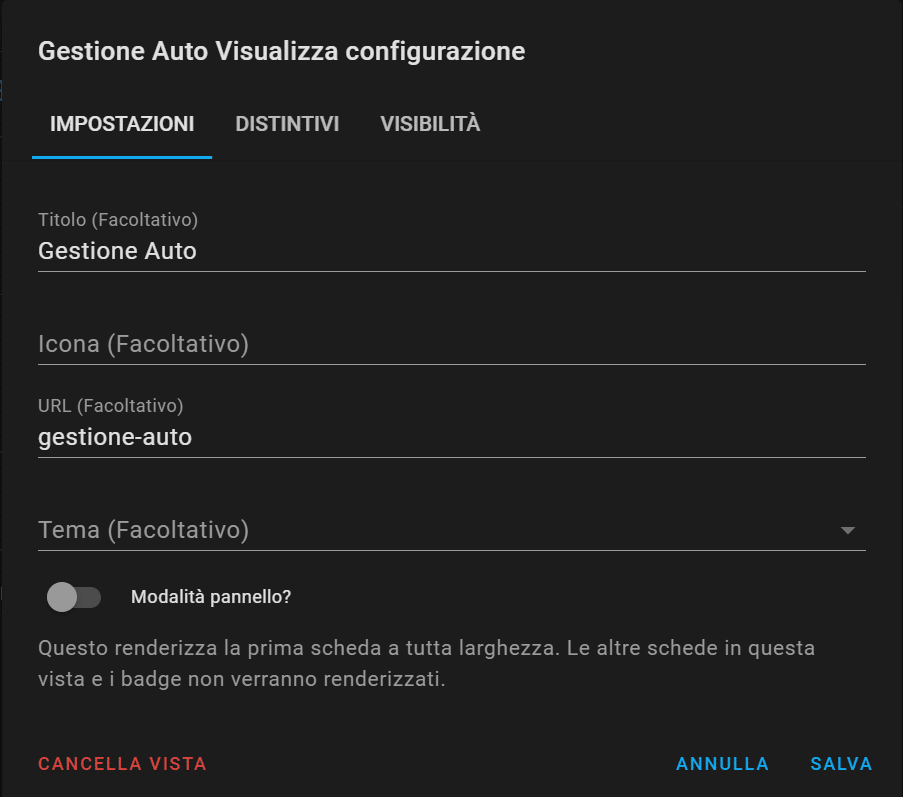
Finally press “save” and move to the newly created board.
Creation of a custom card for Volkswagen ID.3 (and all other vehicles of the ID series)
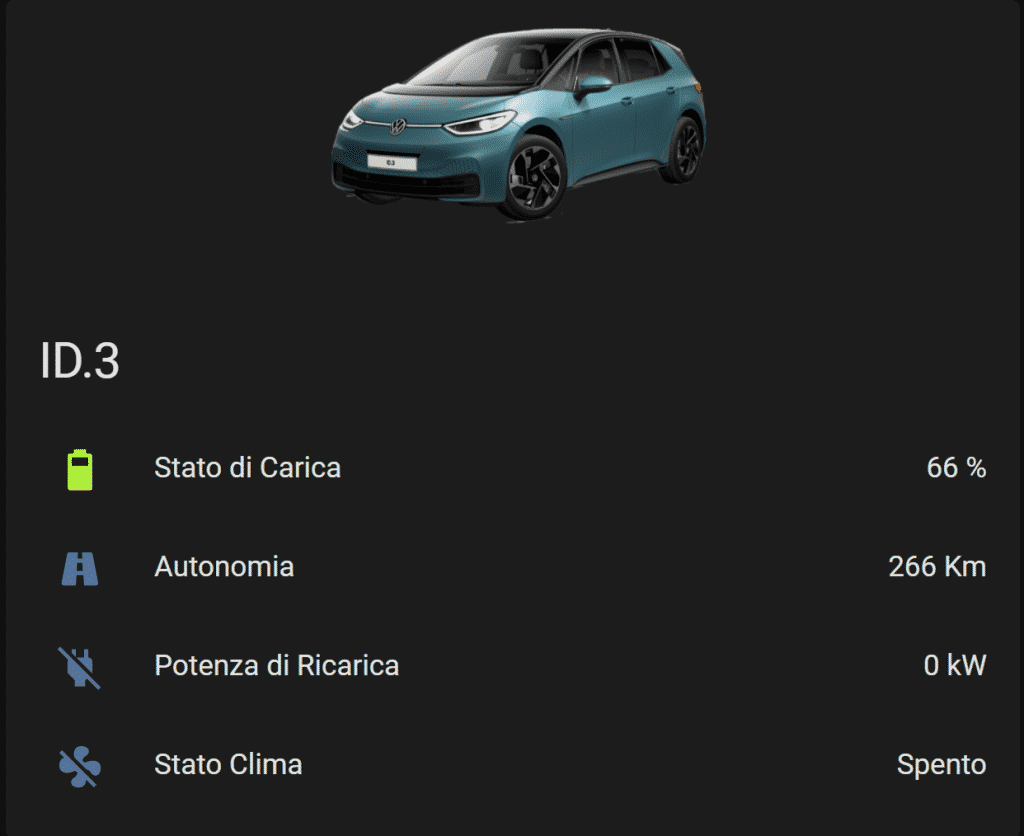
Before creating a custom card it will be necessary, if you want to show an image of the car at the top of the card, to import an image into Home Assistant.
To do this, first we need to import the image that we want to insert into Home Assistant via the Visual Studio Code add-on. You only need to create a folder in the “www” folder (in my case I called it “myimages“) and insert the images that we want to use in Home Assistant. The uploaded images will then be available within Home Assistant at the path “local/myimages/filename.extension“.
Here is the image I used (you can also use it as a template to create your own custom image):
Finally, it will be sufficient to create a new card. To do this, simply click on “Add Card” (if the button is not visible, look at the previous section to understand how to open the dashboard editor). To use the same card I use, just select the “Manual” option and copy the following code, then press save (I assume that the image loaded at the beginning of the guide is saved with the same name and in the same folder as in my server):
type: entities
entities:
  - entity: sensor.id3_charge_state
    name: Stato di Carica
  - entity: sensor.id3_range
    icon: 'mdi:road-variant'
    name: Autonomia
  - entity: sensor.id3_charge_power
    name: Potenza di Ricarica
  - entity: sensor.id3_climatization_state
    name: Stato Clima
header:
  type: picture
  image: local/myimages/id3_business.png
  tap_action:
    action: none
  hold_action:
    action: none
title: ID.3
show_header_toggle: false
state_color: true
Alternatively, you can also create the card using the visual editor (you can also visually modify the card I created by copying the code, saving it and pressing the “Show Visual Editor” button).
Conclusion
In this guide we have seen how to get data from WeConnect ID to use in Home Assistant and how to create a custom dashboard to view the status of the car. With this data we could create interesting automations such as creating more complex charging modes in combination with a wallbox connected to Home Assistant.
If you liked this guide, follow the page on social networks (click on the icons at the bottom of the page) to be informed about all the new articles I will write.